Docker in Practice: How to build an application with Docker?
Hey guys, all right? Do you already know Docker?
Today I’m here to talk quickly about a very relevant topic for those who develop applications and publish in different cloud providers such as AWS, Azure, Heroku, or even Google Cloud Platform, among others.
1. What is Docker?
Nothing more than an open platform for creating, executing and publishing (deploying) containers. A Container is the way to package your application and its dependencies (libraries) in a standardized way.

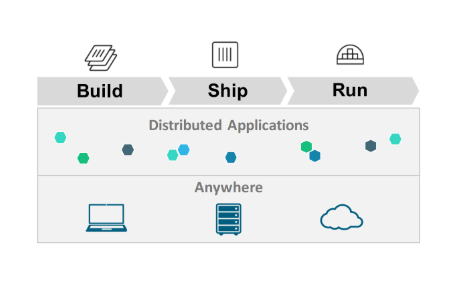
We can say that the key words for Docker are: build, deliver and run in any environment (develop, ship and run anywhere).
1.1 Are there any drawbacks to Docker?
Roughly speaking: no. The question is not exactly whether there is a disadvantage, but whether there is a need to use it. It all depends on your scenario. Some safety issues should also be considered when using the docker and we will talk more about that later.
If your project experiences problems that can be solved by the docker, if it needs to orchestrate containers, then the disadvantages are practically nonexistent.
I’ll leave a link to a video talking more about this topic: 👇👇👇👇👇
2. Docker architecture
In this section, we will cover the architecture of Docker and its main components.

The main components of the architecture involve:
- Docker for Mac, Linux and Windows - versions that allow you to install and run containers on operating systems in isolation.
- Docker Daemon - Software that runs on the machine where Docker is installed. User does not interact directly with the daemon.
- Docker Client - CLI or REST API that accepts user commands and passes these commands on to the Docker daemon.
- Docker Image - It is a template. An image contains all the data and metadata needed to run containers from an image.
- Docker Container - Holds everything needed for an application to run. Each container is created from an image. Each container is an independent isolated application.
- Docker Engine - Used to create images and containers.
- Docker Registry - A collection of hosted and labeled images that together allow the creation of a container’s file system. A record can be public or private.
- Docker Hub - This is a registry used to host and download different images. It can be seen as a SAAS platform for sharing and managing images.
- Dockerfile - A text file containing a simple syntax for creating new images.
- Docker Compose - Used to define applications using different containers.
- Docker Swarm - It is a tool that allows the clustering of Docker Containers. graph of the docker architecture
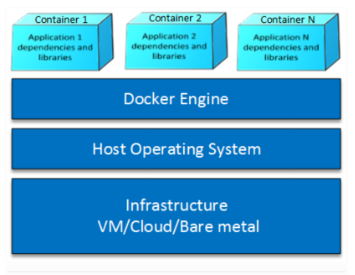
Docker architecture
If we compare it with virtualization technology, we have the following scenario:

VM versus Docker
It is possible to notice that this new architecture greatly simplifies the use of resources and the system overhead so that we can configure and distribute our applications, regardless of the provider that we will be hosting.
The main advantage of this architecture is that there is no need for extra hardware for the host operating system. Everything will be treated as a Container.
Recommended readings: Container orchestration and What is Kubernetes? Everything you need to know about!
3. Is it worth using Docker?
Below I have listed some of the advantages of using Docker:
- It reduces build and deploy time
- Allows you to run multiple containers simultaneously on any host
- It offers a safe way to run isolated applications in containers, packaged with all their dependencies and libraries.
- A dockerized application can be transported and run on any platform without any modifications.
4. How to install Docker?
Linux
If your operating system is Linux, Ubuntu, for example, you must follow these steps:
- Open the terminal with the shortcut Ctrl + Alt + T. Download the latest system updates.
$ sudo apt update && sudo apt upgrade
- Install using the Ubuntu 18.04 repository
$ sudo apt install docker.io
- Start Docker
$ sudo systemctl start docker
- However, ensure that it starts after restart
$ sudo systemctl enable docker
- If you want to check the installed version
$ docker -v
MacOS X
If you are using MacOS, make sure you are using MAC OS X Sierra 10.12 or higher. Download Docker for Mac; Double-click the DMG file, authorize the installation and enter your administrator password, then double-click on Docker.app to start. After downloading, run the following commands in a terminal window to check if everything is ok:
$ docker --version
$ docker-compose --version
$ docker-machine --version
Windows
If you are using Windows, follow these steps:
Make sure that virtualization support is enabled on your computer; Your Windows must be 64bit version 1607 and build: 14393.0; You must enable the hyper-v feature; Download Docker for Windows.
5. Command line utility - Docker CLI
Once you understand the architecture and perform the installation, it’s time to get to know the command line utility. Using the docker consists of informing it of options and arguments as follows:
$ docker [option] [command] [arguments]
To view global system information about Docker, type:
$ docker info
If you want to see all the subcommands of the utility, type in the terminal:
$ docker
attach Attach to a running container
build Build an image from a Dockerfile
commit Create a new image from a container’s changes
cp Copy files / folders between a container and the local filesystem
create Create a new container
diff Inspect changes on a container’s filesystem
events Get real time events from the server
exec Run a command in a running container
export Export a container’s filesystem as a tar archive
history Show the history of an image
images List images
import Import the contents from a tarball to create a filesystem image
info Display system-wide information
inspect Return low-level information on a container or image
kill Kill a running container
load Load an image from a tar archive or STDIN
login Log in to a Docker registry
logout Log out from a Docker registry
logs Fetch the logs of a container
network Manage Docker networks
pause Pause all processes within a container
port List port mappings or a specific mapping for the CONTAINER
ps List containers
pull Pull an image or a repository from a registry
push Push an image or a repository to a registry
rename Rename a container
restart Restart a container
rm Remove one or more containers
rmi Remove one or more images
run Run a command in a new container
save Save one or more images to a tar archive
search Search the Docker Hub for images
start Start one or more stopped containers
stats Display a live stream of container (s) resource usage statistics
stop Stop a running container
tag Tag an image into a repository
top Display the running processes of a container
unpause Unpause all processes within a container
update Update configuration of one or more containers
version Show the Docker version information
volume Manage Docker volumes
wait Block until a container stops, then print its exit code
To learn about the additional options for a specific command of interest, type:
$ docker subcommand --help
Now let’s run a container of the Ubuntu image, to warm up the engines and start our journey in this new world. In a terminal window or command prompt, type:
$ docker run -t -i ubuntu / bin / bash
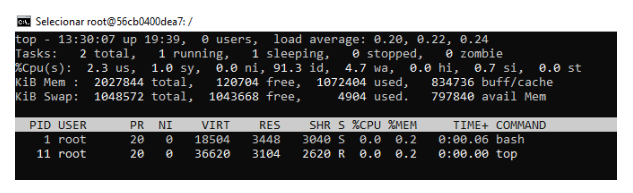
The output resulting from the above command, should indicate that Docker is correctly executing the Ubuntu image, in interactive mode, note that I ran a top command to list the processes that are running internally to the container:
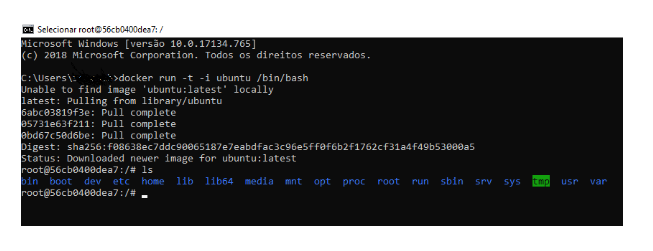
At this point you can already execute any command inside the container, there is no need to use sudo user, because you are already operating with super user privilege (root).
Test by running the commands:
$ apt-get update
… And then install node.js to do a brief test:
$ apt-get install -y nodejs
Notice that we use the utility’s run command and options -i -t:
In another terminal, run the command below to list the Containers:
$ docker ps
To learn about the additional options for a specific command of interest, type:
$ docker subcommand --help
Now let’s run a container of the Ubuntu image, to warm up the engines and start our journey in this new world. In a terminal window or command prompt, type:
$ docker run -t -i ubuntu / bin / bash
The output resulting from the above command, should indicate that Docker is correctly executing the Ubuntu image, in interactive mode, note that I ran a top command to list the processes that are running internally to the container:
At this point you can already execute any command inside the container, there is no need to use sudo user, because you are already operating with super user privilege (root).
Test by running the commands:
$ apt-get update
… And then install node.js to do a brief test:
$ apt-get install -y nodejs
Notice that we use the utility’s run command and options -i -t:
In another terminal, run the command below to list the Containers:
$ docker ps
The resulting output will be:
To display the last created container, tell the command the -l key:
$ docker ps -l
If you want to display all containers - active and inactive, give the command the -a key:
$ docker ps -a
To display an executed or active container, just type:
$ docker stop container-id
The container-id can be found in the output of the docker ps command.
If after making a series of configurations of a docker image you want to make it available or even host it on the Docker Hub for future use, you can.
Just create an account on the Docker Hub and, after logging in, upload the image to the repository.
$ docker login -u username-docker
After logging into the Docker Hub, you can then upload the image of your choice using:
$ docker push username-docker / image-name
After you finish uploading the image, you can access it at the Docker Hub address.
6. Shall we create an application?
Suppose you want to create an application that has all the Node.js dependencies already installed, without installing the dependencies manually or directly on your machine.
Using Docker you can do this in isolation with some commands declared in the configuration file. This is called “Dockerfile”.
Recommended reading: [Kubernetes: the architecture of a cluster] (https://blog.geekhunter.com.br/kubernetes-a-arquitectura-de-um-cluster/)
7. Develop, Ship and Run
Here is an example of the contents of a Dockerfile:
FROM node: 10-alpine
RUN mkdir -p / home / node / app / node_modules && chown -R node: node / home / node / app
WORKDIR / home / node / app
# Install app dependencies
COPY package * .json ./
USER node
RUN npm install
COPY --chown = node: node. .
EXPOSE 8080
CMD ["node", "app.js"]
If we look at the app.js file that defines a basic application in Node.js and express, we will have:
const express = require ('express');
const app = express ();
app.get ('/', function (req, res) {
    res.send ('Geek Hunter!');
});
app.listen (3000, function () {
    console.log ('Geek Hunter server running on port 3000!');
});
Now that we have defined our application in app.js and we already have our Dockerfile, let’s create an image to be able to run our application and deploy it to the image that will be loaded into the container.
Let’s create an image by running the command:
$ docker build -t vmoll / nodejs-image-demo.
The -t option is used to inform a tag for the image we are creating.
After creation it will be possible to run the application using the following command:
$ docker run -it -p 3000: 3000 -h instance-hostname --rm --name nodejs-image-demo vmoll / nodejs-image-demo: latest
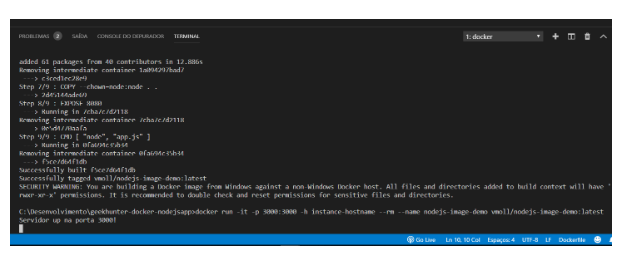
In the command we just executed we inform -p. 3000: 3000.
This command is responsible for binding or linking the local port to an external service port, which will be made available on the machine hosting the application.
See how the application is functional and operational, accessing http: // localhost: 3000, and you will receive the message “Hello Geeks!”:
All the code for the sample application, along with its Dockerfile, are available on my Github page, linked above.
** Important note: ** I created a very simple application here, just to demonstrate that it is possible to deploy the image we created. Our main focus is the creation and execution of containers using Docker.
If you want to create a complete application you can use a generator such as the express-generator. To do this, run the following commands:
$ npm install express-generator -g
$ express myApplication
$ cd myApplication
$ npm install
$ npm start
After that open a browser window at: [http: // localhost: 3000] (http: // localhost: 3000)
As a last tip 🔥, I would like to leave a link here where there are several examples of applications and recommendations that can be studied and followed for better use. Access here:
8. Docker Projects
Guys, I hope I have helped you to understand in a simple way the benefits of using Docker in our applications.
I believe that, if you are not already using this technology, you will soon start using it in your new projects.
Please, follow our social networks:
Thank You and until the next one! 😉👍
Published on Jun 26, 2020 by Vinicius Moll